
For a custom plush keychain, specify the plush body size and the assembled length separately. Mark the exact endpoints on a drawing: for example, from the bottom of the feet to the top of the head for body height, then from the same bottom point to the top of the closed clip for total hanging length. Add width, depth, posture and whether ears, hair or hats are included. A single instruction such as “make it 10 cm” leaves too much open to interpretation.
This guide helps a brand, merchandise buyer or designer prepare a measurable size brief before sampling. It draws on anonymized inquiry themes: briefs specifying both body and total height, 8–10 cm keychain requests, and questions about small-character design constraints. It turns those needs into a measurement method and a brief you can fill in. The examples below are planning illustrations, not specifications or results from a completed customer order.
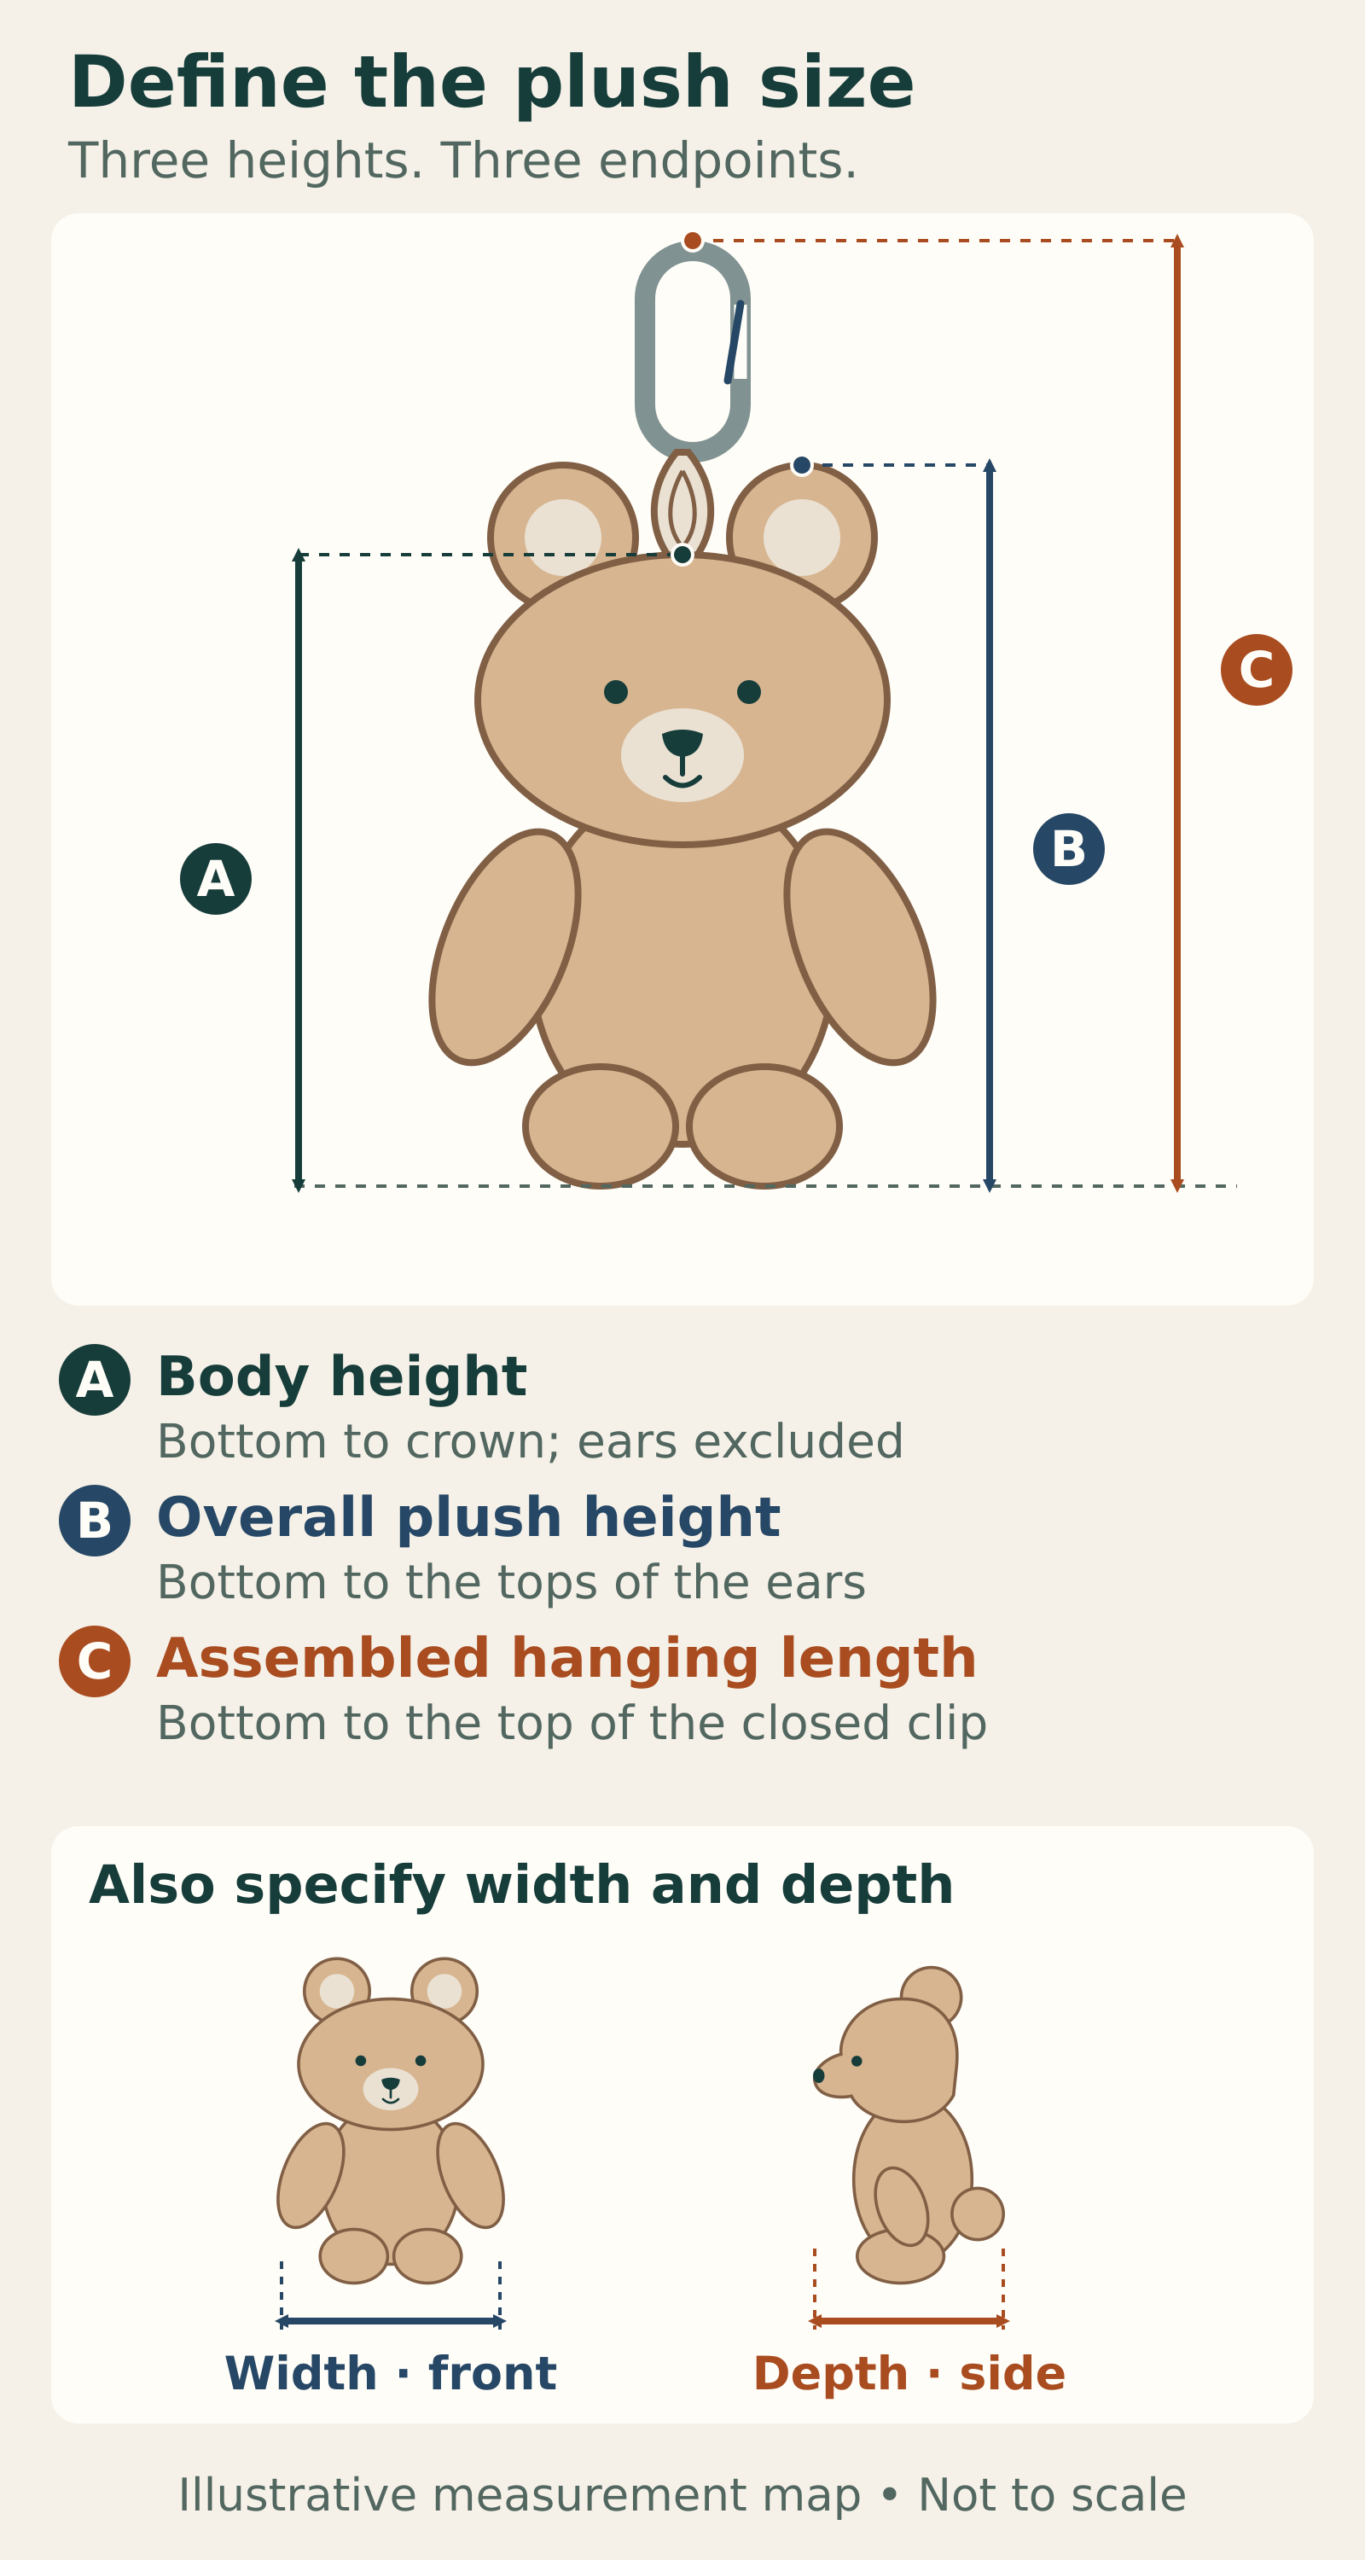
Three measurements that should have different names
There is no reason to make the factory guess which version of “height” you mean. Define your terms on the same page as the artwork and keep those definitions through quotation, sampling and approval.
| Field | Endpoints to mark | What it answers |
|---|---|---|
| A. Body height | Chosen bottom point to the crown of the head; list exclusions such as ears or a hat | How large is the main character? |
| B. Overall plush height | Lowest plush point to the highest plush feature in the agreed pose | How much space does the complete soft character occupy? |
| C. Assembled hanging length | Lowest point to the top of the closed attachment, with the connecting parts in the agreed hanging position | How far does the whole keychain hang? |
| D. Maximum width | Leftmost to rightmost point; state whether arms, wings or clothing are included | How broad is the finished outline? |
| E. Maximum depth | Frontmost to rearmost point in a side view; state treatment of the nose, belly and tail | How thick is the finished item? |
These are recommended project definitions, not a universal toy measurement standard. A seated character may use the seat as its lower reference; a long animal may need a nose-to-tail length instead. If your team uses “body” to mean only the torso, change the label to “head-to-foot height.” The marked drawing should settle the meaning.
For a hat, long ears or soft hair, show the intended resting position. An ear pulled straight upward can create a different reading from the same ear resting naturally. Both may be useful measurements, but they need separate labels.
A 10 cm body does not mean a 10 cm finished keychain
Consider an illustrative brief with a 100 mm head-to-foot body height, 115 mm overall plush height including ears, and a 150 mm assembled hanging length including the closed clip. The character and its attachment occupy different parts of the finished outline. The buyer should approve all three targets rather than asking for one “150 mm plush.”
The difference between 150 mm total length and 100 mm body height is 50 mm. That does not establish that a 50 mm clip will produce the required result. The connection may include a fabric loop, ring and swivel, and the parts can overlap in the hanging direction. A long clip may sit partly beside the ears. Its own end-to-end length and its added hanging length are different measurements.
Ask for an assembled view showing the attachment chain from the sewn loop to the closed clip. Confirm the overall result on the sample. When comparing two hardware options, keep the character dimensions unchanged and compare the total hanging length, visible balance and attachment position separately.
If an existing retail product is your size reference, send its stated dimensions with a photo showing which part was measured. Another brand’s measurements are not a production specification for your design.
Turn an 8–10 cm idea into a clear sampling target
A range is useful during early discussion. Before sampling, decide whether it means “please recommend a size within this range” or “every approved piece must fall within these limits.” Those instructions lead to different decisions. Do not use a broad concept range as an accidental manufacturing tolerance.
- Choose the use context. Show whether the item will hang on a bag, attach to keys, sit in a retail box or be displayed on a card. Identify any physical space it must fit.
- Set the main character target. Pick one body-height definition and a proposed size, or ask the factory to recommend a target from your artwork.
- List features that must stay recognizable. Mark the eye shape, mouth, silhouette and any essential brand detail. Include the intended dimensions of important small graphics.
- Check a full-size mockup. Print the front and side drawings at the proposed scale, checking the printer settings. A paper silhouette is a planning aid; it cannot show softness, stuffing or three-dimensional fit.
- Use the physical sample to resolve the remaining choices. Review size alongside shape and feature readability, then document the approved version.
Do not choose a universal “minimum embroidery size” from a generic chart. Lettering and facial details depend on the artwork, fabric surface, construction and chosen decoration method. If a small detail looks unclear, ask for a sample-based comparison: a simpler shape, a larger feature, another position or another decoration method. This is a design decision rather than a promise that every detail can be reproduced at every size.
Agree on how the sample will be measured
A number is more useful when another person can reproduce it. Include a short measurement note in the brief, especially if your plush has long pile, loose limbs or a soft hat.
- Posture: seated on a flat surface, standing as supported in the drawing, lying flat, or hanging from the specified point
- Condition: unpacked and arranged in the agreed resting shape, without stretching limbs or deliberately compressing the filling
- Surface: state whether the endpoint follows the fabric outline or includes the outer tips of long pile; use the same rule at review
- Attachment: closed clip, naturally extended links and the agreed connection orientation for the total-length photo
- Unit: use millimetres or centimetres consistently; if both are shown, identify one as the controlling unit
- Evidence: label the sample version and photograph front, side and assembled hanging views with the relevant measurement marks
Place the ruler beside the measured part in the same plane where practical, with the camera facing that plane. A tilted ruler or oblique photo can make a size harder to judge. Photographs document the review; they do not replace physical checks when fit or an agreed acceptance limit matters.
For a compressed packaged sample, agree how it should be prepared before measuring. Do not invent a standard recovery time or assume it returns to an exact shape immediately. Keep the preparation note with the readings so the next sample can be checked the same way.
Separate a target size from an accepted tolerance
“100 mm body height” states a target. It does not by itself define what variation is acceptable in production. Ask the factory to propose and confirm appropriate limits for the specific design, material and measurement method. Record the agreed limits before bulk production.
Some dimensions affect fit directly. A maximum total length may matter for a display card, while a maximum width may matter for a box opening. Mark these as fit-critical and explain why. Other dimensions may be appearance references, such as a rounded cheek width. Giving every number the same status can make a brief harder to interpret.
A useful record has four fields: dimension name, target, agreed acceptance range and method. Leave the acceptance range “to confirm” until it is agreed. Avoid copying an arbitrary plus-or-minus figure from another product. A ruler photo and a size check also do not establish attachment strength, small-part safety or compliance with a toy standard.
Check the packaging and every changed variant
The package should be reviewed around the assembled item in its intended packing position. A keychain that hangs at 150 mm may fit differently when its clip is folded beside the body. Note whether folding is intended, which features must stay uncompressed, and where the ring or clip should sit so it does not obscure or press on important details.
Request a packaging-fit sample or documented fit check before approving the package. Do not turn body height into box dimensions or a freight estimate. Packing method, protective materials, units per carton and outer-carton measurements are separate inputs.
Also review dimensional changes across characters. Two designs with the same body-height target may have different ears, tails, hair or clothes, so their maximum width, depth and overall outline may differ. A shared height does not prove that one box or display card fits every variant.
For Aokuma inquiries, list each design, size and colour separately. The MOQ is 500 pieces per design, with size and colour variants calculated separately; a repeat order also uses the 500-piece minimum. See the MOQ and variant-planning guide for the quantity matrix rather than combining unlike variants into one total.
Copyable custom plush keychain size brief
Paste these fields into your project document and attach the marked front and side drawings. Use “undecided” where you want advice; an explicit open question is more useful than an unexplained blank.
Design and artwork version: [name / version / date]
Intended use and destination market: [bag charm, retail item or other use / country]
Intended user age: [age group to be assessed for the actual product]
A Body height: [target / bottom point / top point / excluded features]
B Overall plush height: [target / included ears, hair, hat or other features / resting pose]
C Assembled hanging length: [target / top of closed attachment to lowest point]
D Width and E depth: [targets / whether arms, clothing and tail are included]
Attachment reference: [type / position / finish request / parts still to confirm]
Fit-critical dimensions: [dimension / maximum or minimum needed / reason]
Measurement method and agreed limits: [method / confirmed range or to confirm]
Quantity by design, size and colour: [separate rows]
Packing position and required arrival date: [description / destination / date]
Before approving the size, check these seven points
- The sample and drawing have matching version identifiers
- Body height and assembled hanging length are recorded separately
- Ears, hair, clothing and hardware use the agreed inclusion rules
- Width and depth match the intended outline, not just the front-view height
- Important facial and brand details remain readable at the chosen size
- The assembled item fits the intended packaging or display arrangement
- Any size change, accepted limit and remaining open question is written into the approval record
If a measurement differs from your target, first compare the endpoints and posture. Then record the actual reading and the requested correction. “Body height measures [reading] using A; please revise toward [target]” gives the factory a specific question to resolve. For the broader review process, use the sample-making and approval guide.
Send a size brief for your custom keychain
Have artwork but are still deciding what “10 cm” should include? Send Aokuma your drawings, marked size targets and quantity per variant. Include the clip reference, intended market and arrival date, and identify anything you want the team to recommend. The next step is a project-specific feasibility and quotation review. Price, accepted dimensional limits, packaging, testing scope and delivery arrangements need confirmation for the actual design.
