
Before sampling custom clothing on a plush mascot, specify whether the garment is fixed or removable, how it fits the finished body, where the logo remains visible, and which outfit belongs to each variant. Send front, back and side references, mark unresolved construction choices, and review the clothing on the stuffed mascot in its intended pose.
“A mascot in a branded shirt” leaves several decisions open. Is the shirt a separate garment? Must it come off over a large head? Should the logo be readable while the mascot sits? A scarf introduces a different question: which part of the message is visible after it is folded and positioned?
This guide helps buyers turn those questions into a clothing specification for custom mascot plush toys. It covers miniature garments worn by the toy. Human-sized mascot costumes need a different brief.
Choose what fixed or removable actually means
Start with the intended use. If the mascot should always appear in one uniform, describe that requirement. If changing outfits is part of the product, say who is expected to remove and replace them. Do not leave that decision to the sample maker.
- Integrated clothing appearance: the body panels create the appearance of a shirt or uniform. Specify which edges should look like a collar, cuff or hem. There may be no complete garment underneath those visual details.
- Separate, permanently attached garment: a shirt or scarf is made separately and fixed to the plush. Ask the proposed construction to show attachment points and any visible stitches.
- Removable garment: the clothing comes off without cutting stitches. Define the opening, proposed closure, dressing route and appearance of the uncovered body.
These are construction options to discuss, not a guarantee that every option suits every design. A drawing can look similar across all three while describing substantially different work.
For a fixed shirt, clarify whether only selected points are attached or an edge is sewn into a body seam. For removable clothing, record whether a closure must be hidden in normal display. Ask the manufacturer to propose a workable method rather than assuming a miniature button, zipper or hook-and-loop strip is appropriate.
Hypothetical example: a round mascot has a head wider than its torso. The buyer wants a close-fitting neckline and removable clothing. Those requirements need a dressing solution, such as an opening proposed for review. Enlarging the neckline without approval could change the intended appearance. The brief should identify both requirements before the first sample.
Check the fit on the finished mascot in its normal pose
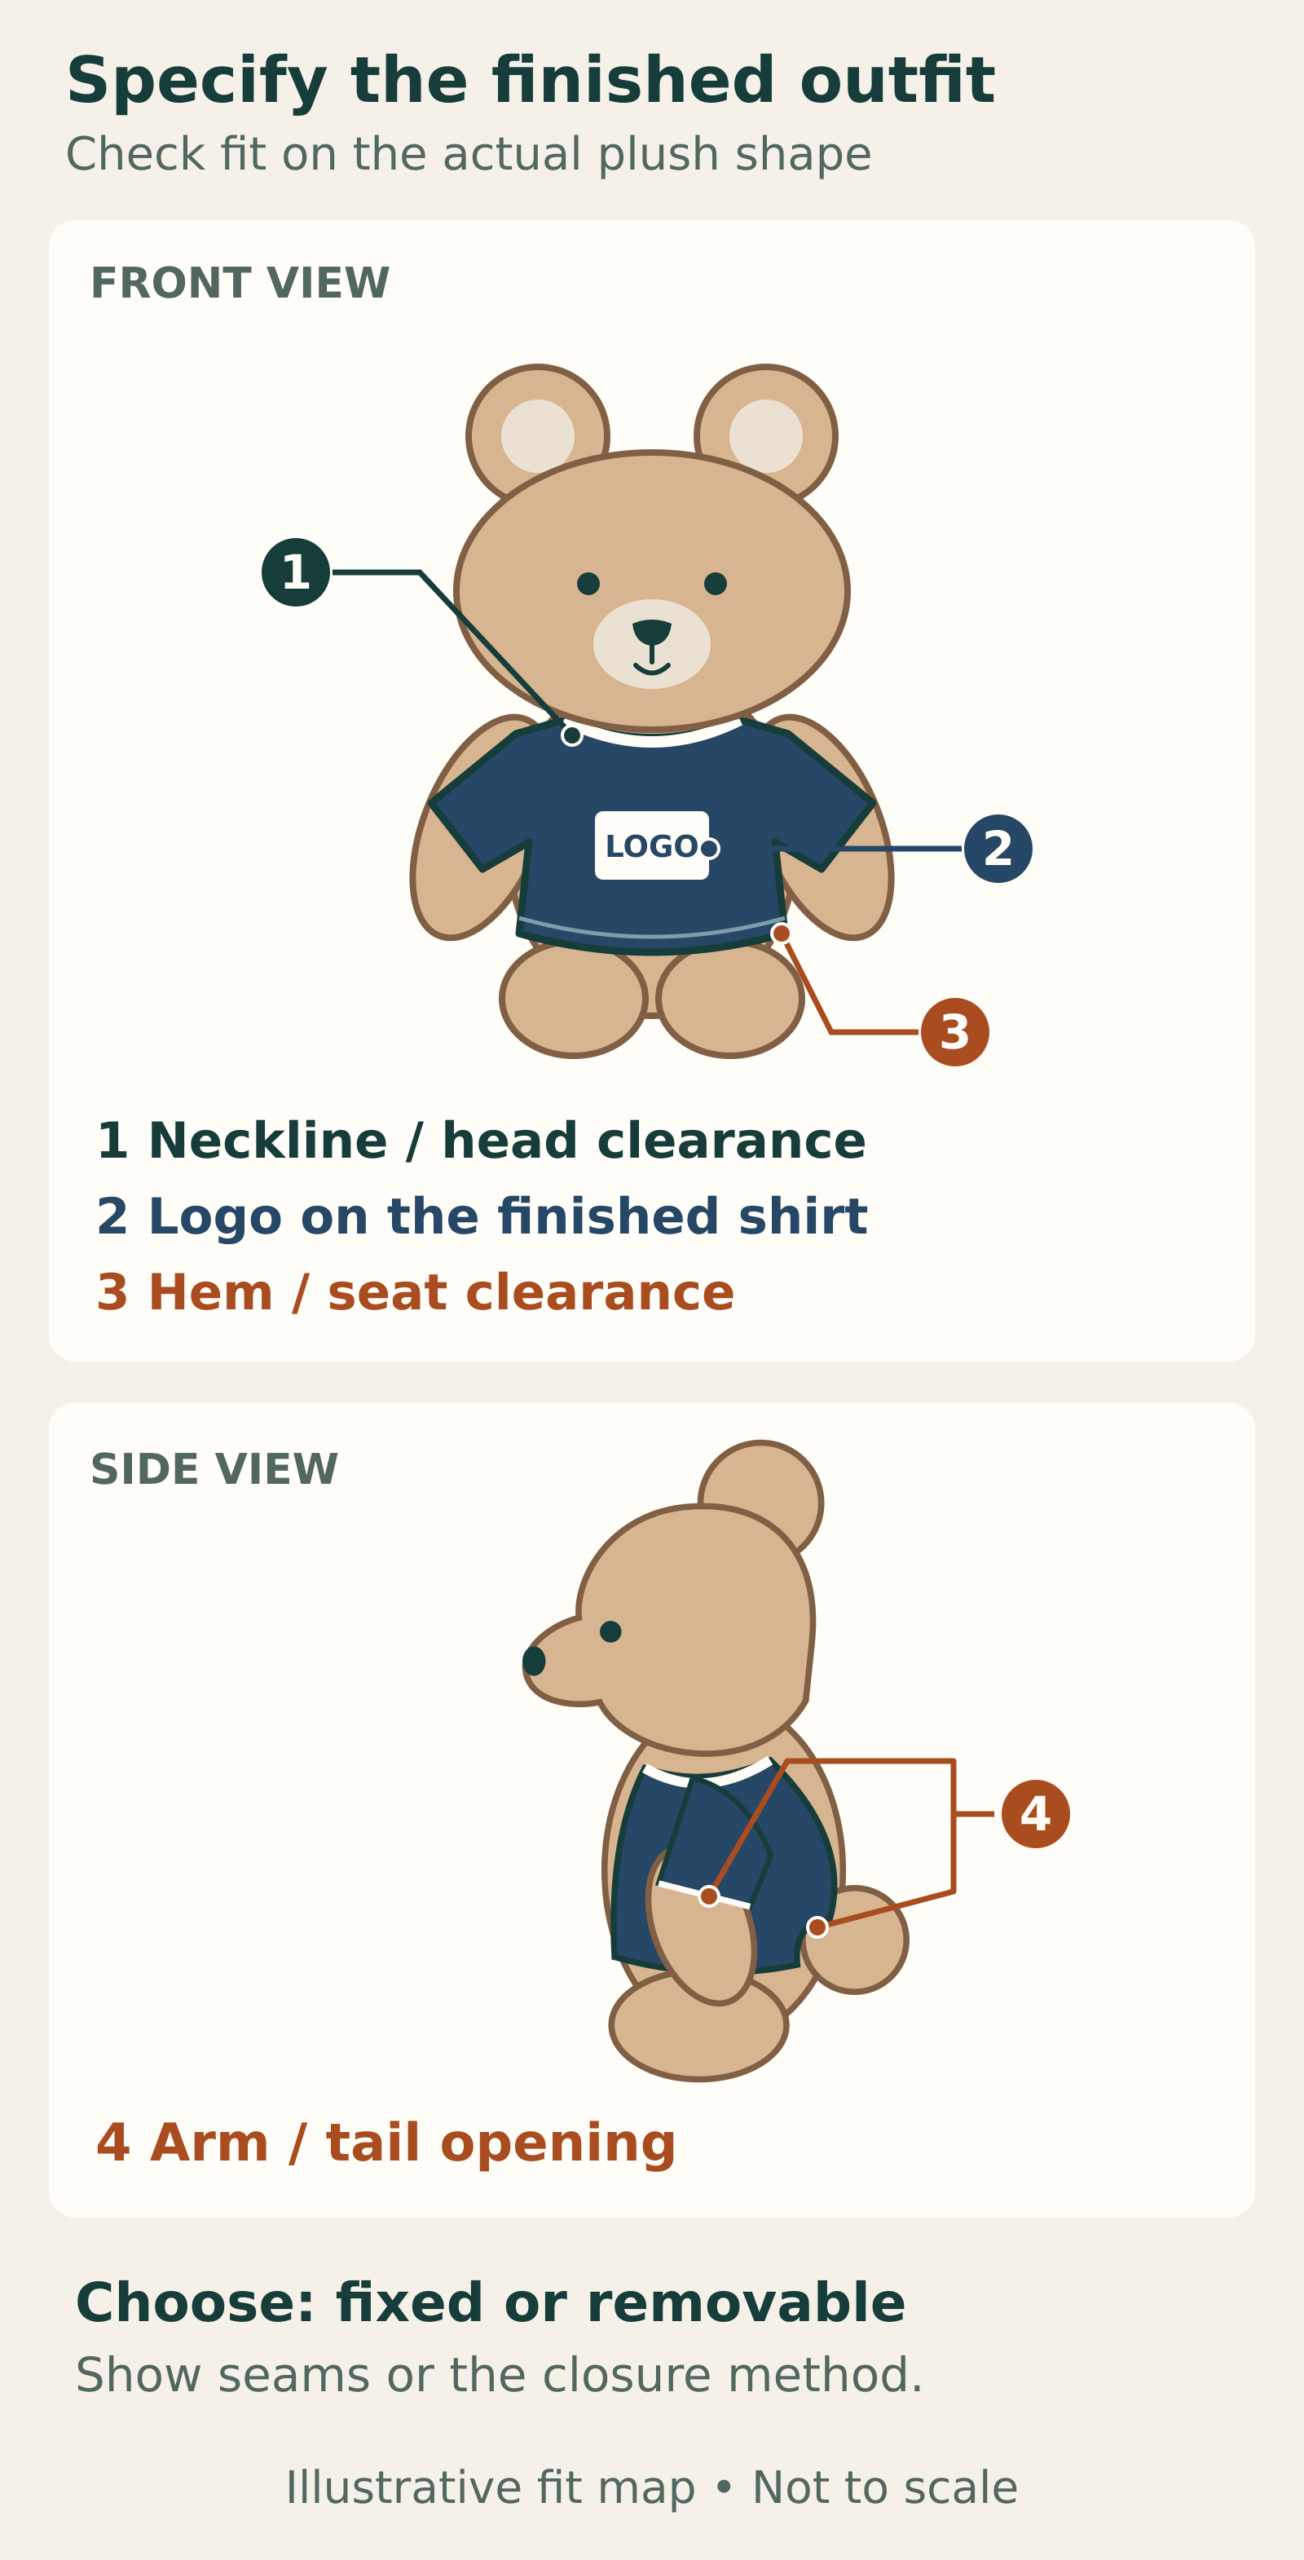
Overall plush height is not enough to define a garment. Clothing also has to accommodate the torso shape, neck, arms and any tail or other projecting feature. If the body is still being developed, mark the clothing fit as provisional and identify which body version it follows.
Specify the pose used for approval. A seated mascot should be reviewed sitting on a level surface, with its legs and arms arranged as intended. Check the front and side views before approving a hem that looked correct on a flat drawing.
- Belly: show the area the shirt should cover. Check whether the front pulls upward, gathers, or stretches the artwork when the toy is seated.
- Head and neck: check collar clearance below the chin or muzzle. For removable clothing, demonstrate the full dressing route past the head, ears or horns.
- Arms: mark sleeve length and where the cuff should finish. Check whether the garment pulls the arms away from their intended position.
- Tail and back: show whether the tail emerges below the hem or through an opening. Review the rear view for bunching, exposed closures and unwanted gaps.
- Base and legs: check whether the hem changes the intended seated appearance or hides a feature the buyer wants visible.
Use annotated views to define garment length, chest width and opening positions. Label a flat garment width as flat width; do not treat it as a measurement around the stuffed body. Ask the sample maker to confirm the fit allowance and measurement method. There is no single clearance value that should be copied across different shapes and fabrics.
If clothing must fit multiple mascot bodies, list each body explicitly. “Shared torso” alone does not establish that the same garment can pass over different heads or sit correctly beside different tails.
Place the logo where the dressed toy can show it
Supply the approved logo file separately from the mascot illustration. Show the intended finished width and height, garment panel, orientation and color reference. Identify which lettering or symbol must remain readable and which details can be simplified only with approval.
Mark the logo against stable garment features, such as the front centerline and neckline. Then review it on the dressed mascot. The visible center of a curved belly may differ from the center of a shirt laid flat.
Check for obstruction by side seams, collar folds, sleeves, the mascot’s paws and the underside of its head. For a back logo, include the tail and closure in the same view. Ask whether the proposed decoration crosses a seam or needs a clearer panel area; do not approve placement from a detached artwork rectangle alone.
A scarf needs its own layout. Specify the fold or knot arrangement, which end faces forward, and the reading direction of the message. Request a view of the scarf laid flat and another as worn. Treat embroidery, printing or an applied label as options to confirm for the actual fabric and artwork, rather than promising one method will reproduce every small detail.
Describe the garment fabric and finish
“Soft shirt” gives little guidance about the intended look. Describe whether the garment should lie close to the body, hold a structured shape, stretch for dressing, or have a visibly textured surface. Share a swatch or reference image and explain which attribute it represents.
Ask the proposed material to be identified in the sample record. Review its thickness beside the plush fabric, the way the collar and hem lie, and whether an attachment or decoration changes the feel. Distinguish a temporary sampling fabric from the intended production material.
Give fabric and decoration colors separate references. If a precise brand color matters, agree on the approval reference and review method; a screen image alone is a limited basis for judging physical color. Identify any requested washing or durability claim before sampling and ask how it would be substantiated. Do not turn a preferred care method into an unverified product instruction.
Give every body and outfit combination its own line
A clothing matrix connects the garment to the toy it belongs on. Use one row per finished variant, even when several rows share a body pattern. Include the head/body reference, garment color, attachment choice, artwork version, quantity and sample status.
The following is a hypothetical planning example, not a customer order, quotation or confirmation of available construction.
| Variant | Mascot reference | Clothing and artwork | Requested construction | Quantity |
|---|---|---|---|---|
| A | Body 01 / Head 01 | Navy shirt / Logo V1 | Fixed; attachment points to confirm | 500 |
| B | Body 01 / Head 01 | Green shirt / Logo V1 | Fixed; separate color sample | 500 |
| C | Body 01 / Head 02 | Navy shirt / Logo V2 | Removable; opening to confirm | 500 |
Aokuma’s MOQ is 500 pieces per design. Different sizes and colorways count separately, each with its own sample and 500-piece minimum. The same 500-piece-per-design minimum applies to repeat orders. A shared body does not allow outfit colors or head designs to be pooled into one minimum. See the MOQ and variant guide for quantity planning.
If interchangeable outfits are intended, add a compatibility requirement showing which garments must fit which bodies. If you want extra garments packed separately, list them separately and request confirmation of availability, pricing and packing scope. Do not assume spare clothing is included with each dressed plush.
Review the clothing sample as a complete assembly
Ask for front, side and back views of the dressed mascot, plus close-ups of branding and attachment points. For removable clothing, request a demonstration of removal and replacement. Decide which checks need the physical sample; photos cannot establish every aspect of feel or handling.
- Confirm the version. Match the body, garment fabric, color and logo to the matrix row. Note any temporary material or unfinished feature.
- Review normal display. Seat or position the mascot as specified. Check belly coverage, sleeve position, collar clearance and tail access.
- Inspect the branding. Check spelling, orientation, visibility and actual-size readability with the clothing in place.
- Check the construction. Locate fixed stitches or closures and compare them with the proposed arrangement. Record unwanted gaps, puckering or exposed details.
- Try the intended interaction. If removable, check the agreed dressing sequence on each relevant body. This handling review is not a substitute for safety testing.
- Record the decision. Mark each item approved, revise, or pending evidence. Attach annotated photos to the correct garment and body version.
Make revision feedback specific. “The left paw covers the last letter when seated; review the logo position without changing the approved logo proportions” describes an observable issue. “Make the shirt better” does not establish what should change.
Keep clothing approval linked to the body version. If the belly, head or arm position changes later, recheck the affected fit and visibility. For the wider approval process, use the custom plush sample guide.
Keep safety review separate from appearance approval
Include the intended age group, use and destination market before choosing closures, loose accessories or long scarf ends. Ask a qualified product-safety specialist or laboratory to assess the complete proposed product and identify the applicable requirements. Sewing a garment in place does not, by itself, establish that the toy is safe or compliant.
For US-bound products, CPSC’s toy safety guidance explains that applicable requirements depend on the specific product. Use it as a starting point for project-specific review, not as evidence that a particular mascot has passed testing.
Confirm the testing scope, sample versions, documentation, cost and timing separately. Neither this checklist nor visual sample approval establishes certification. No testing is implied to be included in the standard sample fee.
Copy this clothing brief into your inquiry
Fill in what you know and leave undecided items clearly marked for recommendation.
- Mascot reference: body/head version, target size and normal display pose
- Garment: shirt, jersey, scarf or other item; front, side and back references
- Construction: integrated appearance, separate fixed garment, or removable; proposed attachment/opening to confirm
- Fit priorities: belly coverage, collar and sleeve position, head clearance, tail treatment and visible body features
- Material: desired texture, thickness, stretch and color reference; acceptable alternatives to review
- Branding: authorized artwork filename/version, finished dimensions, location, orientation and required readable details
- Variants: one row per body, size and colorway; quantity and corresponding garment artwork
- Interaction and packing: who changes clothing, required interchangeability, dressed or separately packed, any spare garments requested
- Project conditions: intended age/use, destination market, required arrival date and testing questions
- Approval: named reviewer, required views, physical review needs and unresolved decisions
Aokuma’s standard sample fee is USD 200 per design, including up to three revision rounds, refundable when the bulk order reaches 3,000 units of the same design. Standard sampling takes 7–10 working days. Special sample cases require a separate quotation and agreement; they do not change the 500-piece bulk MOQ. Confirm revision timing, sample shipping and any additional scope in the quotation.
Send Aokuma your mascot artwork and clothing brief with the variant matrix and unresolved questions. That gives the quotation and sample review a defined starting point, including which decisions still need agreement.
